What is Google Analytics?
Google Analytics Universal/ Universal Analytics (UA) is a free web analytics service offering numerous analytical tools to help organizations and individuals track and analyze their website traffic and use it to their benefit. Companies can use all the data collected from Universal Analytics as insights to improve their marketing strategies and overall reach to their intended audience. Any sort of online marketing strategy, campaign, or move from the organization requires them to view, collect, and examine all the raw data available to them. In this blog, we will be delving into various aspects of Google Analytics 4 listed below –
- Benefits of Universal Analytics
- Features of Universal Analytics
- New Features of Google Analytics 4
- Key differences between UA and GA4
- How to connect Google Analytics 4 to a website?
- Reading Charts on Google Analytics 4(Types of reports)
- Building Strategies – What are Events, and how are they useful?
Let’s look at the numerous benefits that one receives from the usage of Universal Analytics –
- Improves website performance – Universal Analytics enhances website performance by tracking and analyzing user behavior, and providing insightful data, helping organizations identify lacks in their strategies, and understand their target audience’s needs. Organizations can use this data for data-driven decision making, thus improving their website’s performance.
- Understand User Behavior – Universal Analytics monitors users’ actions on the website, turning the number of views, clicks, saves, shares, etc., into insights that the company can then use to understand their users and intended audience, what attracts them, and what bounces them off the website.
- Reach your target audience – Once the company understands its users’ preferences, it becomes easier to reach their target audience and convert them into customers. Universal Analytics helps companies customize and personalize their website according to their audience.
- Track Online Traffic – The most used feature of Universal Analytics is to track online traffic on their website. Traffic equals casual visitors as well as highly-engaging visitors and other internet users who are just browsing and searching the internet to satisfy their curiosity, just read through to get any details, or just anyone who clicks on the website. From big organizations to small businesses, anyone can use this free web analytics tool to track their website traffic.
- Efficient Online Advertising – Once the company gets familiar with its audience’s needs and wants, it can accordingly create and adjust its advertising strategies to make them more efficient and attractive. Universal Analytics helps convert the intended audience into real customers, enhancing the organization’s performance.
Features of Universal Analytics –
- Integration – Universal Analytics allows users to integrate their web analytics tool into other Google products like Google Search Console, Google Sheets, Google Ads, and even third-party apps. This Universal Analytics feature helps users to utilize the collected data from UA by cross-tracking it on other platforms, making it more unified and comprehensive to understand and implement.
- Reporting – Universal Analytics creates various types of reports, such as retention reports, custom reports, and a lot more for the web, allowing users to gain insights and get a quick overview of their strategies and campaign performance. A pre-made report helps users to gain knowledge of their users based on different characteristics like location, in-app purchases, metrics, etc.
- Campaign Tracking – Campaign Tracking is an essential feature of UA, allowing users to track their campaign’s performance using UTM parameters. Tracking the campaign’s performance helps users understand the success of their marketing strategies and adjust them accordingly to create a better campaign in upcoming future.
- User Retention – This feature of Universal Analytics enables website owners to view how many people return to their website after viewing it in the past. By using this feature, organizations can comprehend their users’ actions on their webpage and analyze the said data accordingly.
These are some basic features of Universal Analytics that we will dive further into with the explanation of GA4 (Google Analytics 4). Google Analytics 4 (GA4) is the newly introduced free web analytics tool with more upgraded and advanced features for collecting, analyzing, and tracking data. Let’s take a look at the new features that Google Analytics 4 brings to the table –
- Event-based tracking – Unlike Google Analytics 4, which tracks data based on pageviews, GA4 tracks everything as an event. Clicks, Scrolls, Purchases, or any other user interactions are classified as events. GA4 provides various types of events that can be used by organizations as per their website needs.
- Tracks both app and website data – Unlike Universal Analytics, Google Analytics 4 can track both websites as well as apps. This feature allows organizations to track data on different platforms, including the business’s app and website. GA4 helps users get unified data from multiple platforms at once.
- Debug – The new Debug view feature in Google Analytics 4 allows users to access real-time reporting by tracking every event as they are being set up, enabling organizations to understand if the data being captured is correct without having to wait for hours to check the collected reports. Finding errors in the events and parameters early on helps the organization to undo any mistakes and adjust accordingly.
- AI Insights – Google Analytics 4 comprises Analytics Intelligence that uses machine learning and conditions to detect any changes or emerging trends in the data. AI insights also enable custom conditions that users can set up to be detected in their data.
- Privacy Flexibility – Google Analytics 4 provides cookieless measurements and better privacy aspects, creating an enhanced user experience than ever before.
Key differences between Universal Analytics and Google Analytics 4 –
| Universal Analytics | Google Analytics 4 |
| Session-based data | Event-based data |
| Fewer privacy measurements | Cookieless measurements |
| Data collection separately on different apps | Data collection and tracking across multiple platforms |
| No integration of AI | AI-based insights |
How to connect Google Analytics 4 to the website (non coding) ?
1. Go to WordPress Dashboard
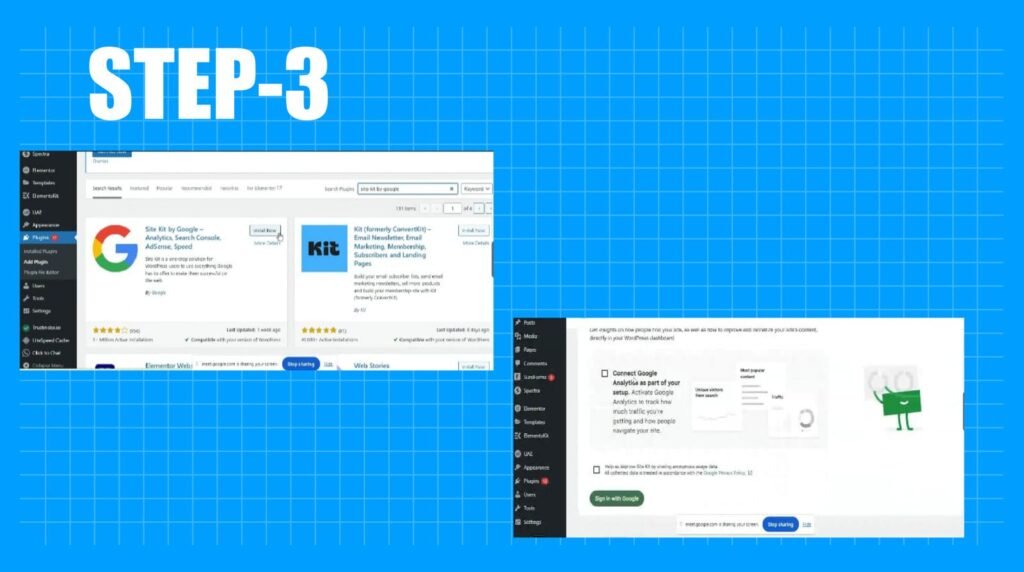
2. Navigate the dashboard > Plugins> Add Plugins

3. Search “Site Kit by Google” > Install and Activate Site Kit > check off the box
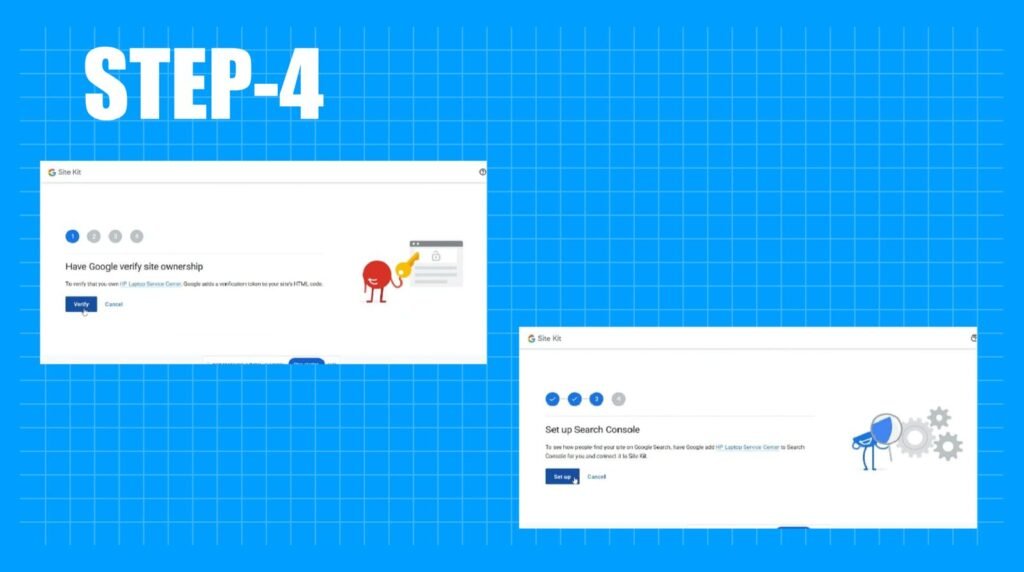
4. Verify
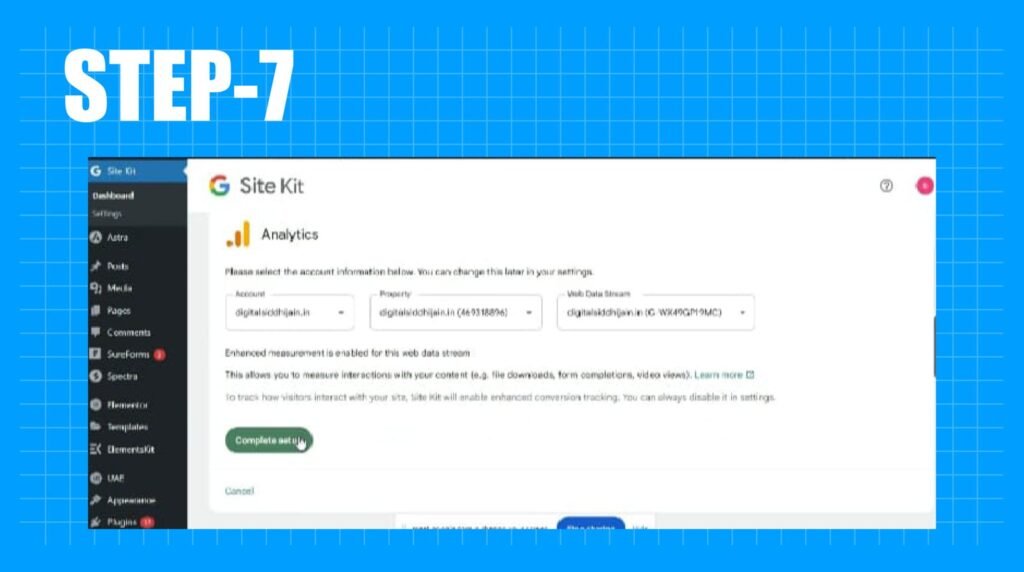
5. Find ‘Google Site Kit” on the dashboard
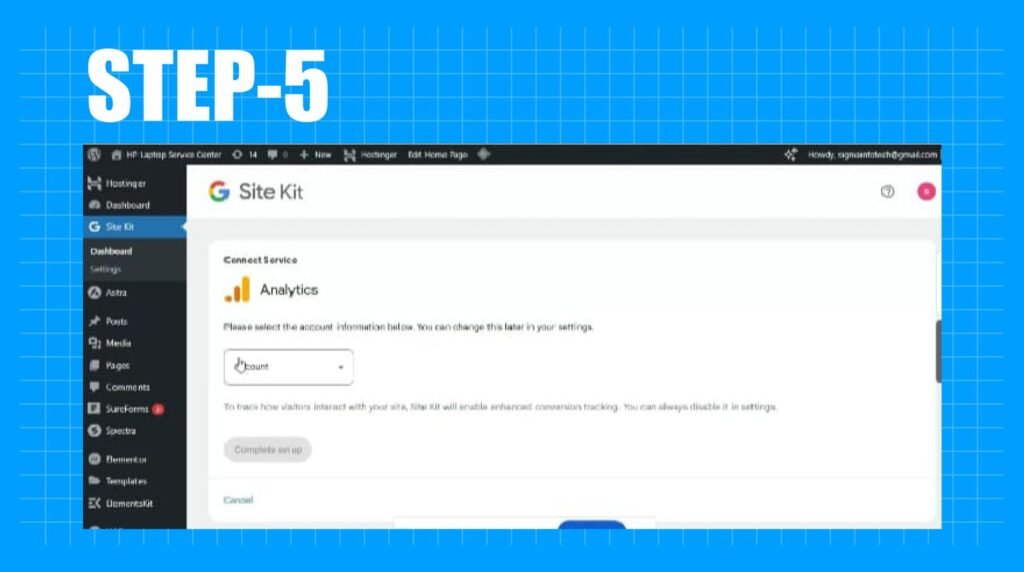
6. Create an account

7. Put in website details and complete your setup.
Reading Charts on Google Analytics 4 –
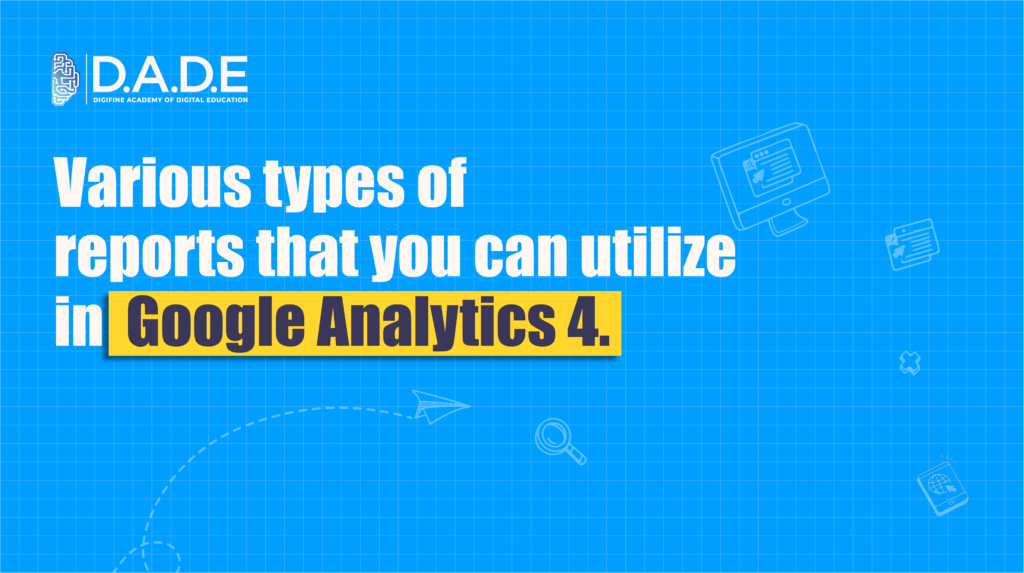
Comparison Report – The Comparison Report in Google Analytics 4 allows users to compare subsets of data side by side. For example, is the website traffic higher in location A than in location B? Are the in-app purchases less on mobile and more on desktop? Is the traffic comparatively less than the previous month? The Course Comparison Report is one of the most insightful reports, helping users understand how their marketing strategies are working in distinct places.
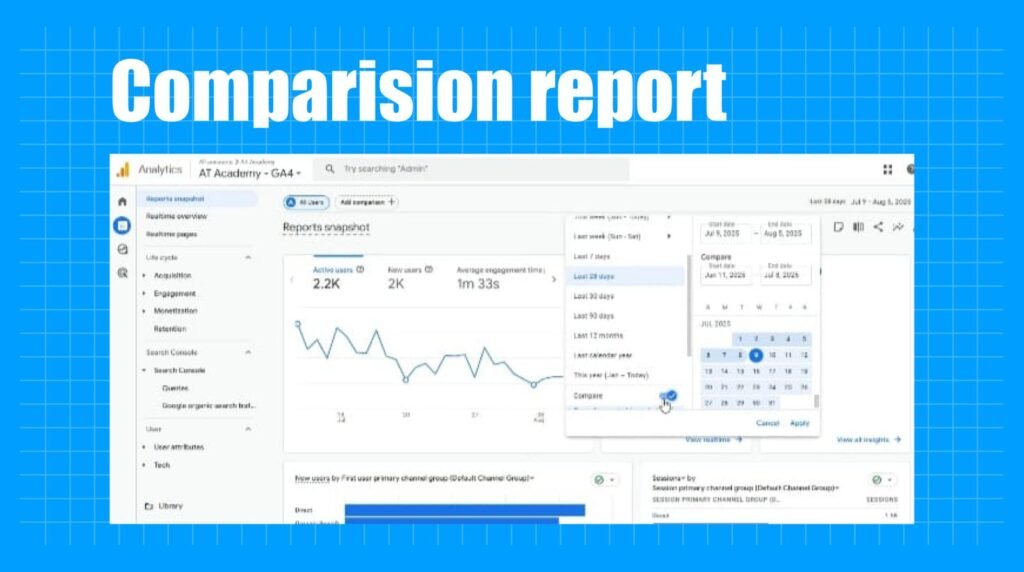
Real-time Reporting – Real-time report shows user interactions on Google Analytics 4 as it is happening, basically showing the live visitors on your website and applications. This real-time report enables organizations to monitor how data is being captured in real-time, rather than having to wait for multiple hours or days. Real-time monitoring benefits organizations as they can undo or adjust their strategies based on the feedback they receive.
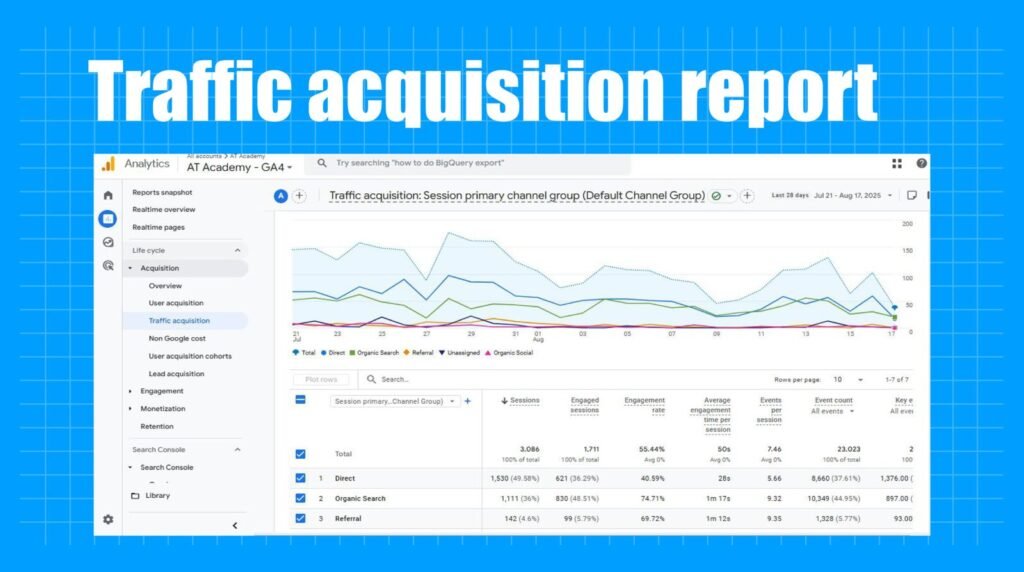
Traffic Acquisition – Traffic Acquisition is a pre-made, detailed report in Google Analytics 4 that allows organizations to view where their users come from, meaning they can see what is the source that is leading them to the website and application, creating traffic. Sources could be organic search, direct link, a different online platform, etc.
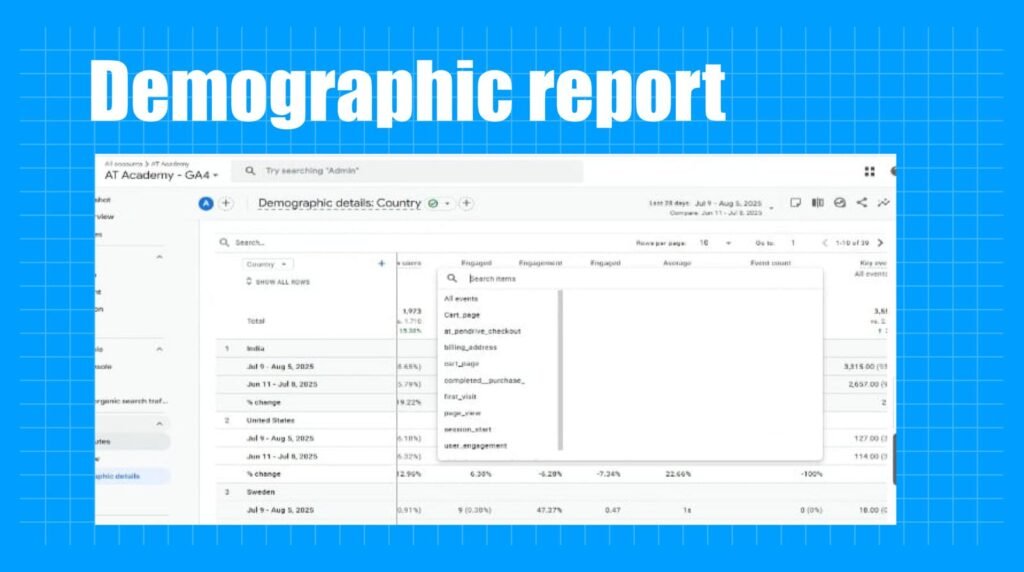
Demographics Report – The Demographics Report is also a pre-made report available in Google Analytics 4 that shows the website/application owner the demographic details of their users, such as age, gender, location, language, etc. Receiving these details helps organizations to understand who their intended audience is and who they are actually reaching through their current marketing strategies.
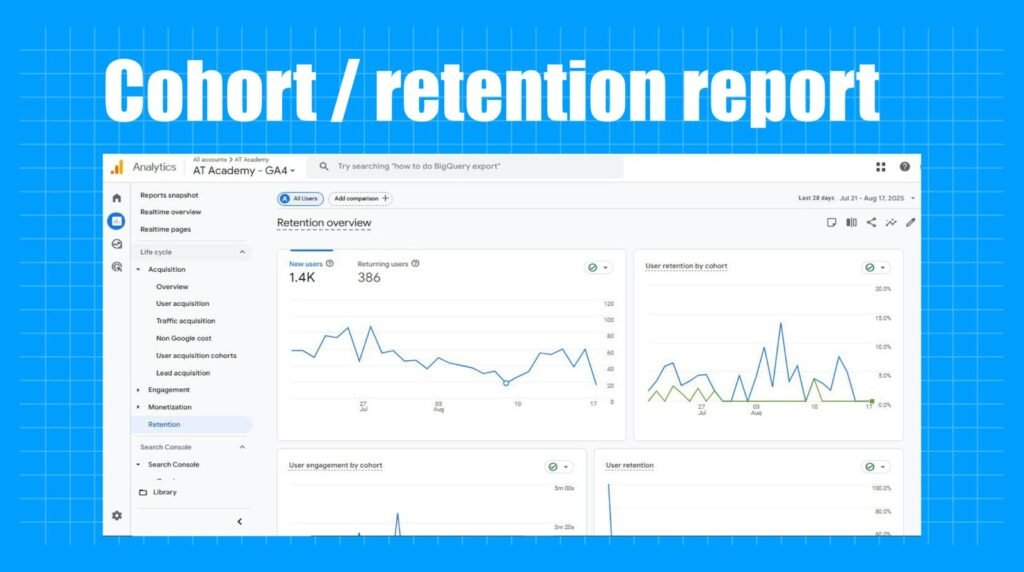
Retention Report – The Retention Report is an overview report in Google Analytics 4 that enables website owners to view how many users return to the website or app after their first visit. This allows organizations to analyze and comprehend their average users’ behavior, guiding them on what aspects to include and exclude in their strategies moving forward.
Building Strategy – What are events, and how are they useful?
Downloading and connecting your website and app to Google Analytics 4 isn’t enough in today’s fast-paced online market. Web owners can implement all the various types of tools available in Google Analytics 4, such as events, reports, app integration, cross-platform tracking, audience segmentation, machine learning insights, and many more. Efficient Online Advertising and Marketing can be done through leveraging all the features on this free web analytics tool and tying it up with your personalized marketing strategy that is tailored to your business or organization. Events are one of the most valuable features introduced in Google Analytics 4, elevating the dynamics of Universal Analytics.
As mentioned before, Events are any sort of interaction or action that users take on the website or the app. The multiple types of events available in Google Analytics 4 are as follows-
- Automatically Collected Events – Automatically collected events are tracked by default in GA4. These are events with basic interaction, like first_visit, user_engagement, and more. Automatically collected events track basic information about user behavior and actions on your website.
- Enhanced Measurement Events – Now we come to events that users can enable and disable as per their own will. Enhanced measurement event tracks a little deeper than automatically collected events, including interactions like downloading a file from the website, making a purchase, watching a video, etc.
- Recommended Events – Recommended events are a set of events provided by GA4 itself based on the type of tracking that an organization or business may require. Recommended events need to be implemented manually and help organizations gain business-specific insights and information.
- Custom Events – Custom Events are customizable events that organizations can set up, according to their business-specific needs.
Before the introduction of Google Analytics 4, Google Analytics administrators indicated that Google would automatically create a GA4 property for every UA property that still does not have a GA4 account. Though it was widely advised that one should manually create the GA4 property and migrate their data accordingly, as Google will create the GA4 property with basic settings, which is not enough for all users.
Steps to migrate from UA to GA4, accurately –
- Go to your Universal Analytics Account
- Navigate Admin Section
- Create a new GA4 property
- Provide basic details (name, time zone, industry size)
- Add a data stream
- If you use GTM, WordPress, etc, paste the ID from your GA4 and trigger it on all the webpages.
- If you don’t use any Google Sites, then to go to the data stream page, scroll down, click on View Tag, and install manually. Paste the JavaScript you received in the <head> of all your web pages.
In conclusion, Google Analytics 4 is an insightful free web analytics platform with a wide range of features that anyone can use for digital marketing purposes. GA4 gives complete creative freedom to users to align their marketing strategies and goals with their tools and use them in a personalized manner as per their business-specific needs. With the new advanced Google Analytics 4, users get an enhanced experience including better privacy, event-based model, customization, real-time monitoring, AI-based insights, and more.
The Universal Analytics account does not show or collect any present data now, though users can view their past data in the account’s history.